Monday 26 June 2017

"Moustache Metal" - by Claudia

"We all know Heavy Metal but what on earth is Moustache Metal ?" I hear you ask...


...well, it is without any doubt the kind of metal that steampunk moustaches are made of!


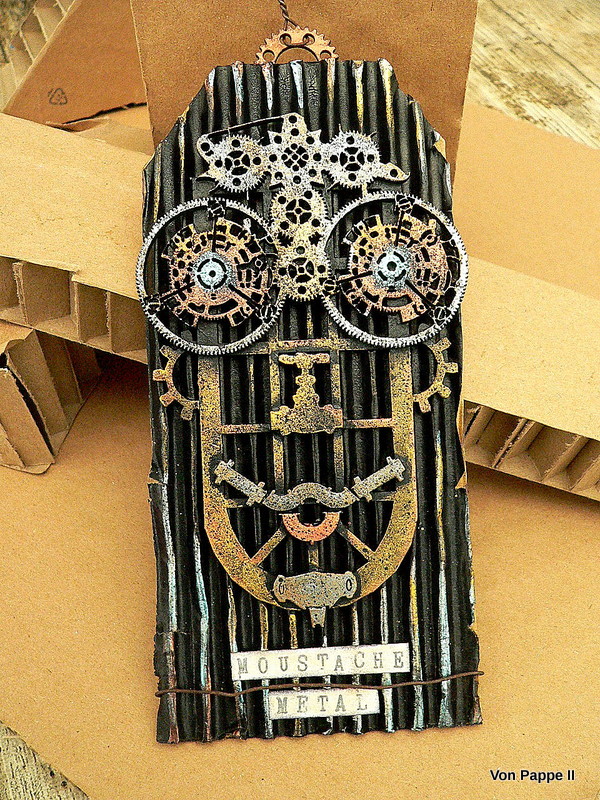
In my case the whole face is made of "metal" to be precise (but I like the moustache most), so let me introduce you to Mr.....erm....honestly I haven't come up with a satisfying name yet...maybe you have an idea for the perfect name of my Metal Moustache Mister on this tag.


Calico Craft Parts used:

- Window MDF Wood Shape - Style 19 - large
- Steampunk Mechanical Clockworks Motif Style 12 - medium
- Pipework Maze MDF Craft Parts
- Sheet of Mini MDF Wood Cogs - Style 11


I love corrugated card and as my wonderful boss, Helen, always uses it to safely wrap my Calico Craft Parts I always have some at hand. And when you use black paint and metal paints or pastes on it it almost looks like corrugated metal (yay! I love that effect!).

So I started with gluing a piece of corrugated card to a flat piece of heavy card for more sturdiness. Then I browsed my stash of Calico Steampunk Parts to form the face. The beautiful Clockworks part that looks like mechanical eyes behind a pair of goggles and with mechanical hair (or a hat) on top was what sparked my idea for a steampunk face in the first place. I also had some left overs from the great Pipework Maze sheet that made a perfect nose, mouth and moustache. And to form the cheekbone I used a small cog and cut it into halves.

I just needed something as the base shape of the whole face....and found one of Helen's awesome window shapes. That was IT!


I played around a little until I found the perfect spots for all the parts and then glued them in place using matte DecoArt Decou-Page.


At that point I was still going for a rectangle format as you can see (but - as I often do - hadn't completely thought it through yet).

Once the glue was dry I fetched my spray paint box (an old large shoe box) and gave everything a thorough coat of Carbon Black DecoArt media Mister acrylic paint (which is a lot faster and more effective if you aim for even coverage in spots where a brush may not reach - just make sure you spray the paint on from different angles).


The paint dries really quick. So I was able to continue after only a few minutes of drying time. I gathered (almost all of) my DecoArt Metallic Lustre pots.


I used my fingertips to add the Metallic Lustres and also used several tones on one piece (for example a lighter tone to the left of the nose to create the illusion of depth or a bit of shading around the eyes). I also added the same tones of Metallic Lustres to the corrugated card to fuse the face with the background.


At that point I found that my guy still looked too shiny, even and "new"...


... so I added some speckles of Carbon Black Mister for a bit of a worn look:


Much better!  But then I got stuck with deciding on how to finish the piece off....the rectangle format didn't "speak to me". So I put my project to the side for a while (which sometimes is the best thing to do when you get stuck, right?) and when I returned I knew I wanted to change my panel into a steampunk tag.


I created a little loop from a small cog that I covered with Copper Kettle Metallic Lustre before I glued it behind the tag.


"Moustache Metal" (I am an alliterations junkie....who would have guessed ;) ) was stamped onto a strip of white card, cut out and covered with a wash (!) of heavily diluted Champagne Ice Metallic Lustre (so the letters would still be visible but at certain angles were almost hidden behind the metal layer on top)


 Some twirled rusty wire was added to the loop on top...

...et voilá! 


I don't know why he looks so surprised, but he definitely must have spotted something very astounding or exciting (maybe you?)...

There are a lot more fantastic steampunk parts to find at the Calico Craft Parts store to build your own steampunk people with! And it was such fun! I hope you will have a lot of fun too and can't wait to see yours!

Hugs and happy crafting!
Claudia
xxx


Wednesday 21 June 2017

By The Sea by Lesley

Hey folks, Lesley here with a sea assemblage for you.

This is the second hanging glass doodah i have done........you can see the other one here.


Lots of new seaside bits and bobs in the shop, including some really cool seaweed.


The seahorse was painted pink, then a layer of crackle glaze over the top......and then gold paint rubbed into the cracks.

The seaweed was painted with green and blue paints. I then applied a layer of diamond glaze and dipped it into a bag of micro beads. Loving that effect!


Then it was just a case of arranging  driftwood discs, shells and some moss. Once i was pleased with the arrangement, i glued the seaweed and seahorse into place, letting it dry overnight.

I actually planned to place two seahorses in the glass doodah.......but there just wasn't enough room.
So i decided to make an ATC using the same colourway as before.


I used a stencil and white paint to create some waves. And green micro beads for the sea.

The ornate frame of the ATC was given a coat of diamond glaze to finish.


Thanks for reading.
L.x

Ingredients used.

Seahorse, style one
Bull Kelp, seaweed, style 4
Shaped ATC with scroll

Sunday 18 June 2017

In the Artist's Studio, a home for brushes by Julie Ann

Hello Everyone! Mondays at Calico are my favourite day of the week these days and today I'm sharing an idea for keeping my favourite brushes in one place on my art table. Please follow me as we step into the studio of Leonardo, the creative cat. He's allowing us a sneaky peek of a special commission...


for his illustrious patron, Lady Ava, the Owl and her little daughter, Luna.


 I'm always finding that my fine brushes and tiny, stencil brushes have slipped down deep in the container behind the larger brushes and brayers - just when I need them quickly. It struck me that if I used one of the  Calico Block Style, wide houses minus the roof, I could create them the perfect home, their own mini studio, where I would always be able to find them!


You can quickly transform Calico house kits with either Gesso and Paint, or the design paper of your choice.


I like to create my own papers, using paints, stamps, stencils and mark making. For this project I chose a stamp with a dictionary definition of 'Artist' on it. For smooth results, I stick the paper with a regular gel matte medium and run a sponge wall-paper roller over it to ensure that there are no air bubbles.


If you cut to just a little wider than the house kit pieces, you can file away excess paper with a nail file, or sand-paper glued to a coffee stirrer. Always make sure your paper is firmly fixed and absolutely dry before sanding the edges.


When my background is in place, I can experiment with faces I've drawn,matching them up to different bodies - I love this part, as my imagination really starts to spark. Placing Leonardo's head on this rather jaunty Elizabethan gentleman's body instantly suggested to me an artist surveying his subject. All he needed was a paintbrush sketched in!


This combination suggested a reason for the commission - a mother and daughter portrait!


I decided to give my brush studio some legs from these letter beads, filling in the holes either side with pearls.


As the project progresses, I like to fix it together temporarily to see how the colours and elements are working together. The mini doors and windows from the sheet on my table looked so effective just as they were and they blended so well with Leonardo's doublet that I decided to keep the natural wood.


Even though, Leonardo is but a cat, his artistry gives him wings! I gave his little MDF wing the Renaissance look with just a spot of gilding and some thick gold embossing along the edge.


I wonder if Ava is happy with the likeness Leonardo created? I'm hoping that the inspirational messages will encourage me to spread my own wings artistically and to find new stories to tell! Have a wonderful creative time of arty adventures until we meet again, here at Calico in 2 weeks' time!

Calico Craft Parts used in this Project
Block Style Wide House, medium
Sheet of Tiny MDF Windows and Doors
Sheet of MDF Wings, style 1

Wednesday 14 June 2017

Wild Roses by Jennie

Hello everyone and welcome to my second post of the month here at Calico Craft Parts. A gentle project for you today which I found very relaxing and quite absorbing.


Although I am not great with a paintbrush (more a splat it on with a palette knife sort of person!) I just adored this Flowering Dogwood Sprig and just felt I had to have a go at painting it.


I decided to give the whole piece a light coat of watered down gesso first just to give it a "bit of tooth" and then gradually built up my layers of colours using chalk finish paints. I do find chalk paints give a lovely finish but I did use them very lightly and with a little water in order not to lose the lovely markings.


I don't have any photographs of the process but here you can see how I have used two colours of green for the leaves to give a little depth.


The white looks a little bland against the green so it did get a couple of coats and then once the yellow buds were dry I covered the whole sprig with a satin glaze. It is not really possible to see it in the photograph but it really does make a difference.

For this project I used the Large Sprig (measuring 120mm x 100mm) and it fits perfectly onto one of the 125mm x 125mm square Birch Plywood Blank Plaques. 


I used the darker green chalk paint as my base and then used DecoArt Weathered Wood Crackle in White - I just love watching it crackle right in front of your eyes! I then rubbed a little brown ink around the edges to give it a more worn look.


And finally there was just enough space to add some of the copperplate letters.

I love Roses but they are not easy to grow here in Shetland (especially in the wind battered valley where I live), so I have to rely on the Rosa Rugosa Shrub Roses, which do look a little like this Flowering Dogwood. I have both white and red growing in the garden but my favourites are always the white blooms which always look so spectacular against the surrounding greenery (and anything else I might manage to grow!)

I hope this little plaque will remind me of my summer garden when in the depths of winter.


As always thank  you for joining me today and happy crafting!

Jennie x

Calico Craft Parts Used:


Monday 12 June 2017

Paradise Found - a Mini Journal - by Claudia

Servus, hi and thank you for stopping by today! It's been two weeks since my last Calico Craft Parts project and tutorial so this means it is time for another inspirational make to share with you.
Oh, and thank you all so much for the lovely comments over here and on facebook on my last DT make! :)

It seems I am already in an ocean-summer-splash-y mood as my last make (over HERE) was an ocean life themed one and this one is too. I just love all the fab aquatic and marine wood shapes and especially the beautiful star fish shape evoked in me the image of me, sitting in an Italian beach restaurant with yummy fresh sea food, good wine and the restaurant being decorated with fishermen's nets, collected star fish, shells and crustaceans of all kinds.


So I created this star fish mini album or travel journal (depending on what you want to use it for...notes taken at beautiful destinations or collecting tickets and pictures...or all of these ;)


Calico Craft Parts used:

- Starfish MDF Wood Shape - Style 1
- Square Shape Mixed Media Board (two pieces)
- Sheet of Mini MDF Nautical Motifs - Style 6

(as always, please, click on the images for a larger view)


I started with painting the mixed media squares with Burnt Umber heavy body acrylic paint.


While these were set aside to dry I painted the base for my starfish. I used DecoArt Americana "Pumpkin" as my base...


...and then mixed that with "True Red" to shade the starfish.


Once the paint was dry I applied some dark brown archival stamping ink around the edges using a piece of blending foam.


I used my heat tool to make sure that everything was dry so I could apply a thorough coat of DecoArt media Clear Crackle Glaze using a soft brush. As the images shows I applied a rather thick layer to get larger cracks.


The covered starfish was set aside to dry naturally. 
Time to loosely mix a bit of DecoArt media white Crackle Paste with some drops of media fluid acrylics "Cobalt Teal Hue" and "Phtalo Turquoise". I made sure there were still some streaks of darker paste visible and applied the mix to the covers using a palette knife.


In the meantime the Crackle Glaze on the starfish had already dried so I could continue with adding a layer of Carbon Black media Antiquing Cream and letting it set completely.


Then I went in with a damp soft cloth and removed most of the Antiquing Cream so only the cracks remained black.


I sealed the starfish with a thin coat of DecoArt media Ultra Matte Varnish so none of the Antiquing Cream would come off or be reactivated during the next steps. It also gives some tooth for more paint to hold on to - so this step actually is a cool double duty thingie.


Before I had decided on how to paint my starfish I had browsed the internet for images. It's incredible how many different starfish there are!!! Wow!

I started painting mine with dots in DecoArt Americana "Coral Blush".


Then I painted thin lines in "Yellow Light" Americana paint and more dots - this time in "Pink" Americana multi-surface NEON paint along these lines.


Using "Orange" multi-surface NEON paint I "shaded" the pink dots by only painting "half of the dots" with it...(I hope that makes sense).


This close up hopefully shows the effect of the "shading" - it really adds some dimension to the painted dots.


To visually fuse the starfish with the turquoise cover I also added turquoise dots to the dots lines in the middle of each arm.


And to fuse the cover with the starfish I scraped on some orange multi-surface NEON paint with a palette knife.


I found the starfish was a bit too bright so I toned it down with a thin wash of DecoArt media white Antiquing Cream. While wiping that back I also decided to wipe off the yellow lines that I had painted in the centre of the starfish as they were too dominant (as I had added a sealing coat of varnish that worked pretty well).


I had prepared a piece of "fishernet" and "glued" that in place by placing it directly on the cover and scraping on some white Crackle Paste to hold it in place.


Two painted tiny shells were added to the back cover in the same way. Then I punched the holes for the binding.


For a bit more depth I sprinkled on some turquoise and white DecoArt media Shimmer Mister paint, using the nozzles' tubes for sprinkling.


I drew a thin white outline around the covers' edges using a white gel pen.


The starfish was fixed to the cover using a hot glue gun. The word sticker was added and both - starfish  and sticker - were outlined with the gel pen too.


I cut to size some pages for my mini journal/album and distressed the edges using a craft knife. Some dark brown spray ink was spritzed onto my craft mat so I could dip the pages' edges into it. For a finish I glued some designer paper to the insides of the covers using matte DecoArt Decou-Page.

 Once all was dry I put my album together using two pieces of rough string.

If you struggle with threading rough cord through small holes simply wrap some sticky tape around the ends (and remove it once you're done with threading).


Done! Here it is - my little "Paradise Found" travel journal/album. I think I will give it to my lovely niece for her birthday ;)


There are blue starfish out there, yellow and red ones, light beige ones, bright pink and orange ones, ...well honestly there are so many beautiful styles of starfish that you could do a lot of starfish designs without having to repeat yourself....nature's designs really always are the most amazing and beautiful ones, aren't they?!!!
(I didn't stick to a specific starfish design by the way but rather combined several designs that I liked and followed the patterns).


I hope you will have a lot of fun designing your own starfish and/or using one or the other technique shown in this tutorial! Thanks for stopping by and see you in two weeks!

Hugs and happy crafting!
Claudia 
xxx